Introduction
In embedded development, a successful automated build does not always mean the product is ready. The code may compile and the software image may be created correctly, but the real question is still waiting on the bench: does it actually work on the board?
That is where hardware-in-the-loop validation helps. Instead of leaving physical testing as a manual step at the end, real devices become part of the regular automated checks.
At Grinn, we use LAVA, the Linaro Automated Validation Architecture, to connect the software build system with boards in the lab. LAVA makes those boards available for automated testing: a job can reserve a device, install a software image, start the board, run tests, and collect logs.
For a full overview of Grinn's hardware validation setup, see the accompanying whitepaper. It covers our architecture, rack hardware setup, device templates, lab worker setup, test examples, and operating model. Here, we focus on why the setup matters and how the main pieces fit together.
The Basic Idea
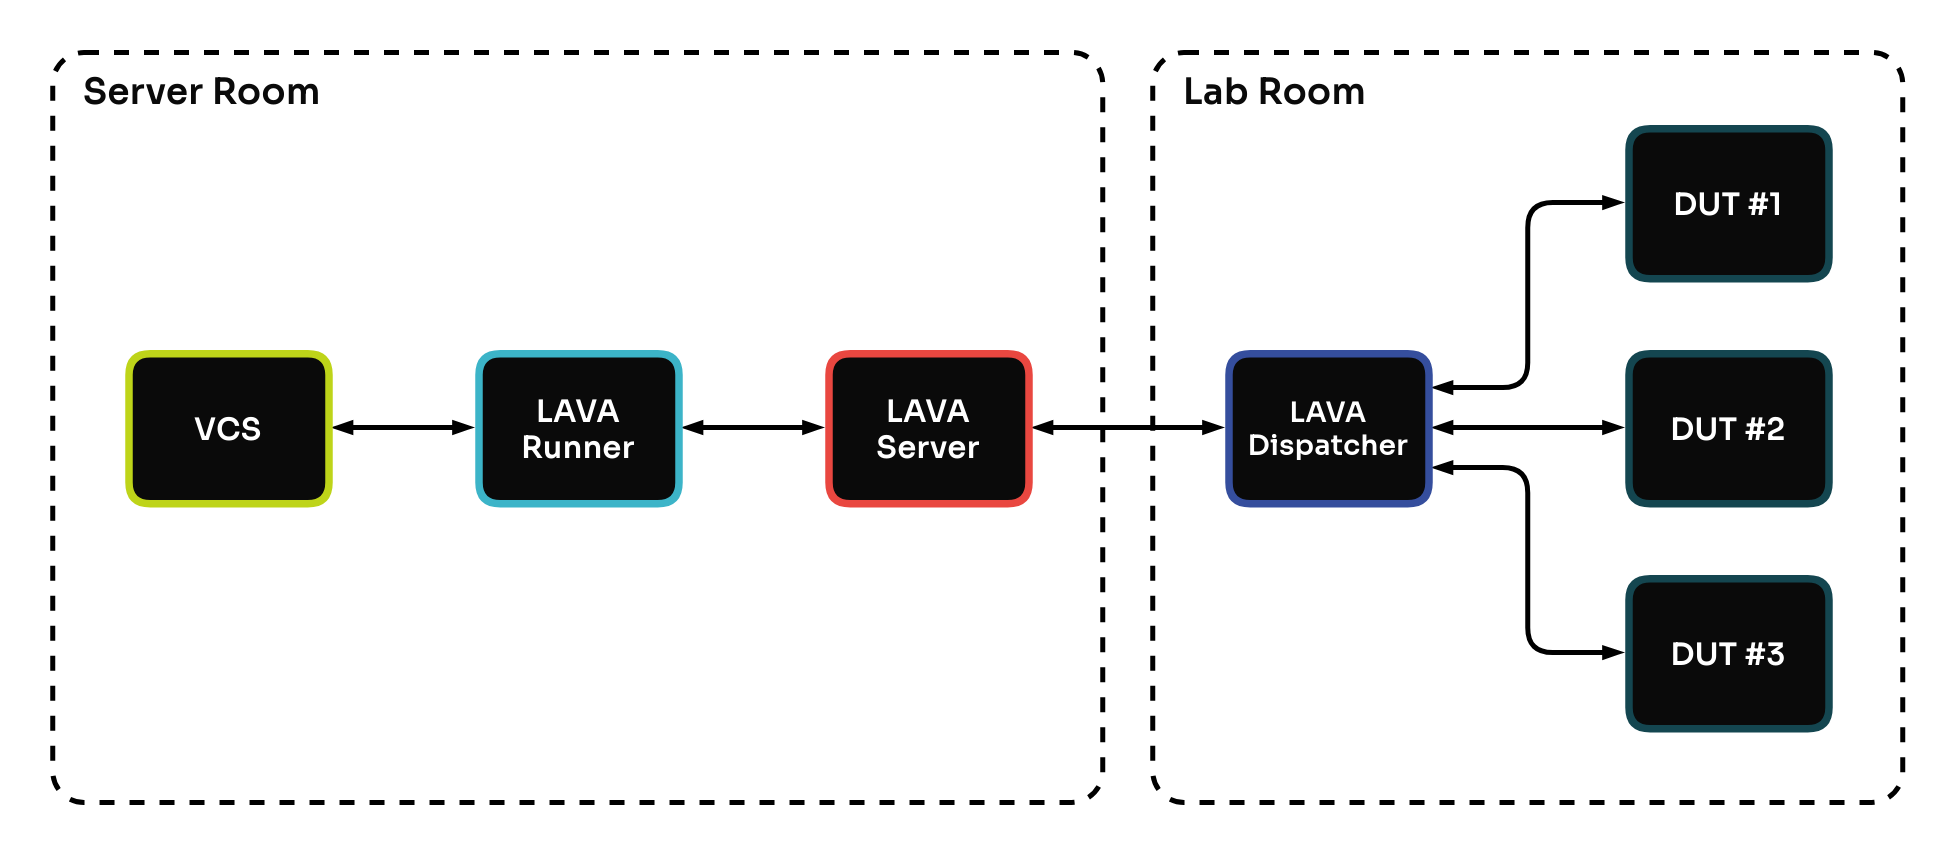
Figure: A high-level view of the hardware validation pipeline.
The LAVA server acts as the central coordinator. It stores jobs, schedules work, tracks devices, and keeps the history of each run.
The dispatcher is the worker in the lab. It is connected to the boards and handles the practical steps needed to prepare, start, and test them.
The build system does not need to know the lab details. It submits a job, LAVA selects a device, and the dispatcher performs the physical work.
This separation is useful because the central system can stay stable while the hardware-facing side can live wherever the boards are.
What a Job Does
A typical hardware validation job starts in the build system. It creates the software image and submits a LAVA job definition. LAVA selects a matching device from the lab inventory. The dispatcher downloads the build outputs, prepares the target, installs the image, resets the board, and follows the startup logs.
Once the target is ready, LAVA runs the selected test on the board. The test reports results, measurements, and logs that can be inspected in LAVA and sent back to the build system.
The important part is that the job describes the whole route to a trustworthy result. Installing the image, starting the board, running tests, collecting logs, and reporting the final status are all part of one automated run.

Figure: Hardware validation flow.
What Gets Tested
The tests themselves stay intentionally simple. Each test usually consists of a small LAVA definition and a script that runs on the board after it starts. The script can check whatever matters for a given board or product: networking, storage, peripherals, system configuration, or other hardware-specific features.
Keeping the tests as ordinary scripts also makes them easier to debug outside LAVA.
Operating the Lab
A hardware lab is never just software. Real devices have state, and they sometimes need to be prepared or recovered before a test can run. LAVA makes those realities part of the test infrastructure.
Device templates describe how each board type should be controlled, so the lab-specific knowledge is captured once and reused by many jobs.
Health checks keep the lab usable. They run small routine jobs that prove a device can still perform the basic flow: preparation, software installation, startup, and communication.
The Result
Hardware validation does not remove the complexity of embedded testing, but it gives that complexity a clear place to live. Preparation, flashing, startup logs, test scripts, measurements, and build-system status become parts of one repeatable process instead of separate manual steps.
For developers, this means hardware tests can be triggered from the same place they already build software, and the results can be reviewed like any other automated job. For the lab, it means practical knowledge moves from memory and manual routines into templates, scripts, and logs.
In short, real boards stay part of the process, but the work around them becomes more visible, repeatable, and easier to scale.
This blog post is only a general overview. For implementation details, rack setup notes, examples, and a fuller description of Grinn's architecture, see the accompanying whitepaper.




 Ignacy Kajdan